
WordPress is considered one of the most SEO friendly web platforms and frameworks, and one of the reasons behind this is that WordPress allows you to enhance your posts, blogs and web pages in multiple ways. You can optimize your posts and web pages for visitors as well as search engines, and thus, attract a huge inflow of traffic to the website.
One such entity that you can use to boost your posts and make them easier to find by the search engines is the addition of the “Custom Fields”.
What Are WordPress Custom Fields?
The “Custom Fields” is a term which is used to refer the metadata used for adding additional information to your post including the date/time, author name, title etc.
In WordPress, when you write a new post, the WordPress, by default, segregates it into two parts, one of which is the content added to the post. For example, if you have written a blog post, the first part will comprise of all the text, images, videos and links added to it and the other part includes the information pertaining to the content, like its title, the date & time of publishing, author name etc. This information is known as the “Metadata”.
While WordPress, by itself, appends the metadata to the post and doesn’t require the user to do so, but, if you want, you can edit this information and write customized metadata for the post with the help of “Custom Fields“.
How To Add Custom Fields To the WordPress Posts?
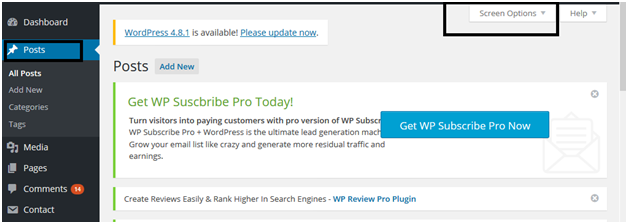
Login to your WordPress account and click on “Posts” and then click on “Screen Options” button located at the top of the screen.
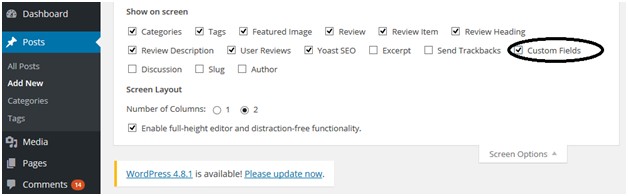
Now check the “Custom Fields” option and you will be able to see various checkboxes. Click on the “Customs Field” checkbox.
Scroll down the screen to see the “Customs Field” box wherein you can fill up the required information.
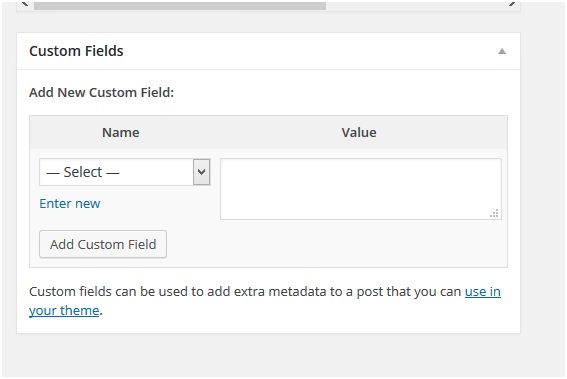
The custom fields in an already posted page can also be updated or edited at any time, and every time you make any changes, click on the “Add Custom Field” button to save your changes.
Custom Field Tips, Tricks and Hacks
-
Displaying Custom Fields On Your Website
In order to display the custom fields on your website, the WordPress theme files.
First of all, look for the theme file which you need to edit in order to display your custom field. Ideally, as you are editing the custom fields for a single post and want to display them on a single post, you would need to edit the content-single.php file or single.php file.
You would have to edit the WordPress loop in order to enter your customs field. So, look for the line, given below:
| <?php while ( have_posts() ) : the_post(); ?> |
Add your code before the following line.
| <?php endwhile; // end of the loop. ?> |
Add the following code to display the custom fields on your website in your theme file
| <?php echo get_post_meta($post >ID, ‘key’, true); ?> |
Replace the key with your custom fields’ name. For example, you can use the following line of code.
| <p>Today’s Weather: <?php echo get_post_meta($post->ID, ‘Weather’, true); ?></p> |
Now, you can save your changes and check the post to find out if the changes have been applied to the post or not.
-
Creating a User Interface for the Customs Field
Once you add a custom field to your WordPress website’s posts, then, every time when you write a post, you would have to select that field and enter its value.
But, this becomes a bit difficult when you have multiple users or authors posting on your website, or when you have more than one custom field. So, one of the more convenient options for adding the values for the custom fields is by creating the “User Interface”.
While you can do this by creating a User Interface yourself or can use an SEO Plugin like “SEO by Yoast“.
The “Meta Description” and “SEO Title” box provided by the Yoast Plugin are the custom meta boxes using which meta information can be added to the post.
Advanced Custom Fields Plugin
One of the easiest ways to add the custom fields to your post is by using a dedicated plugin which has been specifically designed for this purpose. One such plugin is “Advanced Custom Fields“.
Using this plugin, one can:
- Create the custom fields
- Segregate or group the custom fields
- Display the custom fields in a custom meta box on the WordPress’s post edit screens
-
Using Conditional Statement For Hiding Empty Custom Fields
One can use a conditional statement for hiding those custom fields which are empty. But, in order to do it, it’s important to first check which custom field is empty or if a specific custom field is empty or not empty before displaying it.
For this, a modification in the code is required to check if the field has data in it or not.
<?php
$Weather = get_post_meta($post->ID, ‘Weather’, true);
if ($mood) { ?>
<p>Today’s Weather: <? echo $Weather; ?></p>
<?php
} else {
// do nothing;
}
For editing the code, you can change the “Weather” with your custom field name.
- Adding Guest Author Name With the Custom Fields
This tweak in the code using the custom fields is very helpful when you want to add a guest post to the website without adding a new user profile.
It makes sense because one cannot add a new user for a single post.
So, to add a guest author name using the custom fields, add the following piece of code function.php file in your theme.
add_filter( ‘the_author’, ‘guest_author_name’ );
add_filter( ‘get_the_author_display_name’, ‘guest_author_name’ );
function guest_author_name( $name ) {
global $post;
$author = get_post_meta( $post->ID, ‘guest-author’, true );
if ( $author )
$name = $author;
return $name;
}
This will add the customs field for the “Guest Author Name” and then, you can easily edit this field whenever required while posting the guest posts.
If you don’t want to edit the code yourself or are not that tech savvy that you can edit the code, you can also use a site-specific plugin to accomplish this.


