It’s not only you, but any website owner using WordPress for their website will first see the WordPress Dashboard. Whenever you access the WordPress admin panel after furnishing required login credentials, a dashboard appears in front of you.
This Dashboard is a complete collection of all functionalities of the WordPress, so you further need not reach any additional pages to access some key functionality. At times you even feel that your WordPress dashboard is cluttered with all unnecessary things like additional plugins and default widgets etc.
Well, you can go through this tutorial if you are a WordPress beginner as it helps you in customizing the WordPress dashboard without making changes to the code.
To customize the information or things that you see on the WordPress dashboard, you must click on the ‘Screen Options’ present to the top-right side of your WordPress Screen.

Once you click on the screen options, there are different options that get displayed in an expanded panel. You can select those options that you don’t want to see on your WordPress dashboard. You are even provided with an option to include extra columns and by default settings, the number of columns is set to ‘2’.
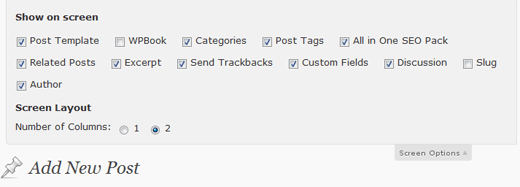
Some additional options get added to the box when you have W3-Edge plugin installed on your website. You can simply drag-drop the options to rearrange the boxes as per your liking. In case if you are not satisfied with how your write panel is arranged then you can hide or show boxes to make it look better organized.
Often you end up in dilemma, when it comes to enhancing the comments number that is depicted at backend. As per the settings, only 20 comments get displayed where as you can increase the number to 50 comments which makes moderating easier. Well, to execute it you must reach the Screen Options and access the Comments page.

You can find the Screen Options button on every page of your WordPress Dashboard. If you don’t like to alter the coding part, then the above said procedure is best way of customizing the Dashboard.

