One of the important functions of WordPress is incorporating an options page into your personalized WordPress theme. The theme that will be chosen to work on is the classic theme. It can be found inside the wpcontent/themes folder. Within the folder you will find various files, but the most important file which we will work on is the functions.php file.
Step 1:
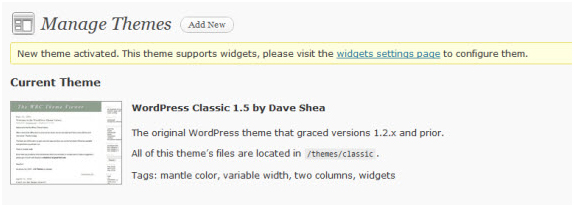
Firstly go to the WordPress admin panel and press on the Appearances tab, followed by the Themes option, and activate the classic theme.
Step 2
Open the functions.php file and add the basic framework code which goes like this:
1<?php
2$themename = \”Classic Theme\”;
3$shortname = \”ct\”;
Once that is completed we start filling in the details within that same file in the form of this program code:
1$options = array (
2 array( \”name\” => $themename.\” Options\”,
3 \”type\” => \”title\”),
4 array( \”type\” => \”open\”),
5 array( \”name\” => \”Color Scheme\”,
6 \”desc\” => \”Select the color scheme for the theme\”,
7 \”id\” => $shortname.\”_color_scheme\”,
8 \”type\” => \”select\”,
9 \”options\” => array(\”blue\”, \”red\”, \”green\”),
10 \”std\” => \”blue\”),
11 array( \”name\” => \”Logo URL\”,
12 \”desc\” => \”Enter the link to your logo image\”,
13 \”id\” => $shortname.\”_logo\”,
14 \”type\” => \”text\”,
15 \”std\” => \”\”),
16 array( \”name\” => \”Homepage header image\”,
17 \”desc\” => \”Enter the link to an image used for the homepage header.\”,
18 \”id\” => $shortname.\”_header_img\”,
19 \”type\” => \”text\”,
20 \”std\” => \”\”),
21 array( \”name\” => \”Footer copyright text\”,
22 \”desc\” => \”Enter text used in the right side of the footer. It can be HTML\”,
23 \”id\” => $shortname.\”_footer_text\”,
24 \”type\” => \”text\”,
25 \”std\” => \”\”),
26 array( \”name\” => \”Google Analytics Code\”,
27 \”desc\” => \”Paste your Google Analytics or other tracking code in this box.\”,
28 \”id\” => $shortname.\”_ga_code\”,
29 \”type\” => \”textarea\”,
30 \”std\” => \”\”),
31 array( \”name\” => \”Feedburner URL\”,
32 \”desc\” => \”Paste your Feedburner URL here to let readers see it in your website\”,
33 \”id\” => $shortname.\”_feedburner\”,
34 \”type\” => \”text\”,
35 \”std\” => get_bloginfo(\’rss2_url\’)),
36 array( \”type\” => \”close\”));
In the above program there are several arrays. Each array has a specific option coded in. For example the first array has the title of the page coded.
Step 3
Now that the options are ready for use, how do we make them visible? That is pretty simple. Again we add a program code to the functions.php file.
1 function mytheme_add_admin() {
2 global $themename, $shortname, $options;
3 if ( $_GET[\’page\’] == basename(__FILE__) ) {
4 if ( \’save\’ == $_REQUEST[\’action\’] ) {
5 foreach ($options as $value) {
6 update_option( $value[\’id\’], $_REQUEST[ $value[\’id\’] ] ); }
7 foreach ($options as $value) {
8 if( isset( $_REQUEST[ $value[\’id\’] ] ) ) { update_option( $value[\’id\’],$_REQUEST[ $value[\’id\’] ] ); } else { delete_option( $value[\’id\’] ); } }
9 header(\”Location: themes.php?page=functions.php&saved=true\”);
10 die;
11 } else if( \’reset\’ == $_REQUEST[\’action\’] ) {
12 foreach ($options as $value) {
13 delete_option( $value[\’id\’] ); }
14 header(\”Location: themes.php?page=functions.php&reset=true\”);
15 die;
16 }
17 }
18 add_menu_page($themename.\” Options\”, \”\”.$themename.\” Options\”,\’edit_themes\’, basename(__FILE__), \’mytheme_admin\’);
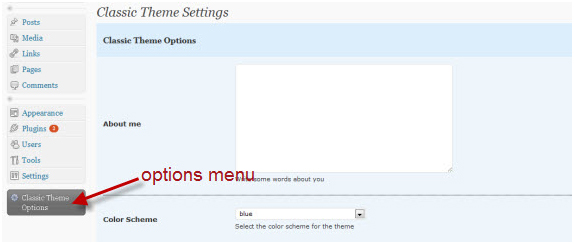
Here the function has been named mytheme_add_admin. This function is used for updating to new values. The last line in the above program adds a new theme page in the Appearance box.
Step 4:
Now though the new theme is viewable it still needs the options to be functioning. Using this code and adding it to functions.php we get the options ready.
1 <div class=\”wrap\”>
2 <h2><?php echo $themename; ?> Settings</h2>
3
4 <form method=\”post\”>
5
6 <?php foreach ($options as $value) {
7 switch ( $value[\’type\’] ) {
8
9 case \”open\”:
10 ?>
11 <table width=\”100%\” border=\”0\” style=\”background-color:#cdcdcd; padding:10px;\”>
12
13 <?php break;
14
15 case \”close\”:
16 ?>
17
18 </table><br />
19
20 <?php break;
21
22 case \”title\”:
23 ?>
24 <table width=\”100%\” border=\”0\” style=\”background-color:#868686; padding:5px 10px;\”><tr>
25 <td colspan=\”2\”><h3 style=\”font-family:Georgia,\’Times New Roman\’,Times,serif;\”><?php echo $value[\’name\’]; ?></h3></td>
26 </tr>
27
28 <?php break;
29
30 case \’text\’:
31 ?>
32
33 <tr>
34 <td width=\”20%\” rowspan=\”2\” valign=\”middle\”><strong><?php echo$value[\’name\’]; ?></strong></td>
35 <td width=\”80%\”><input style=\”width:400px;\” name=\”<?php echo $value[\’id\’]; ?>\” id=\”<?php echo $value[\’id\’]; ?>\” type=\”<?php echo $value[\’type\’]; ?>\” value=\”<?php if ( get_settings( $value[\’id\’] ) != \”\”) { echo get_settings( $value[\’id\’] ); } else { echo $value[\’std\’]; } ?>\”/></td>
36 </tr>
37
38 <tr>
39 <td><small><?php echo $value[\’desc\’]; ?></small></td>
40 </tr><tr><td colspan=\”2\” style=\”margin-bottom:5px;border-bottom:1px dotted #000000;\”> </td></tr><tr><td colspan=\”2\”> </td></tr>
41
42 <?php
43 break;
44
45 case \’textarea\’:
46 ?>
47
48 <tr>
49 <td width=\”20%\” rowspan=\”2\” valign=\”middle\”><strong><?php echo$value[\’name\’]; ?></strong></td>
50 <td width=\”80%\”><textarea name=\”<?php echo $value[\’id\’]; ?>\”style=\”width:400px; height:200px;\” type=\”<?php echo $value[\’type\’]; ?>\”cols=\”\” rows=\”\”><?php if ( get_settings( $value[\’id\’] ) != \”\”) { echoget_settings( $value[\’id\’] ); } else { echo $value[\’std\’]; } ?></textarea></td>
51
52 </tr>
53
54 <tr>
55 <td><small><?php echo $value[\’desc\’]; ?></small></td>
56 </tr><tr><td colspan=\”2\” style=\”margin-bottom:5px;border-bottom:1px dotted #000000;\”> </td></tr><tr><td colspan=\”2\”> </td></tr>
57
58 <?php
59 break;
60
61 case \’select\’:
62 ?>
63 <tr>
64 <td width=\”20%\” rowspan=\”2\” valign=\”middle\”><strong><?php echo$value[\’name\’]; ?></strong></td>
65 <td width=\”80%\”><select style=\”width:240px;\” name=\”<?php echo $value[\’id\’]; ?>\” id=\”<?php echo $value[\’id\’]; ?>\”><?php foreach($value[\’options\’] as $option) { ?><option<?php if ( get_settings($value[\’id\’] ) == $option) { echo \’ selected=\”selected\”\’; } elseif($option == $value[\’std\’]) { echo \’ selected=\”selected\”\’; } ?>><?php echo$option; ?></option><?php } ?></select></td>
66 </tr>
67
68 <tr>
69 <td><small><?php echo $value[\’desc\’]; ?></small></td>
70 </tr><tr><td colspan=\”2\” style=\”margin-bottom:5px;border-bottom:1px dotted #000000;\”> </td></tr><tr><td colspan=\”2\”> </td></tr>
71
72 <?php
73 break;
74
75 case \”checkbox\”:
76 ?>
77 <tr>
78 <td width=\”20%\” rowspan=\”2\” valign=\”middle\”><strong><?php echo$value[\’name\’]; ?></strong></td>
79 <td width=\”80%\”><?php if(get_option($value[\’id\’])){ $checked =\”checked=\”checked\”\”; }else{ $checked = \”\”;} ?>
80 <input type=\”checkbox\” name=\”<?php echo $value[\’id\’]; ?>\” id=\”<?php echo $value[\’id\’]; ?>\” value=\”true\” <?php echo $checked; ?> />
81 </td>
82 </tr>
83
84 <tr>
85 <td><small><?php echo $value[\’desc\’]; ?></small></td>
86 </tr><tr><td colspan=\”2\” style=\”margin-bottom:5px;border-bottom:1px dotted #000000;\”> </td></tr><tr><td colspan=\”2\”> </td></tr>
87
88 <?php break;
89
90 }
91 }
92 ?>
93
94 <p class=\”submit\”>
95 <input name=\”save\” type=\”submit\” value=\”Save changes\” />
96 <input type=\”hidden\” name=\”action\” value=\”save\” />
97 </p>
98 </form>
99 <form method=\”post\”>
100 <p class=\”submit\”>
101 <input name=\”reset\” type=\”submit\” value=\”Reset\” />
102 <input type=\”hidden\” name=\”action\” value=\”reset\” />
103 </p>
104 </form>
105 </div>
Step 5:
The options page is ready but to finally get it operating, we use this short code:
1 <?php
2 }
3 add_action(\’admin_menu\’, \’mytheme_add_admin\’);
4 ?>
Step 6
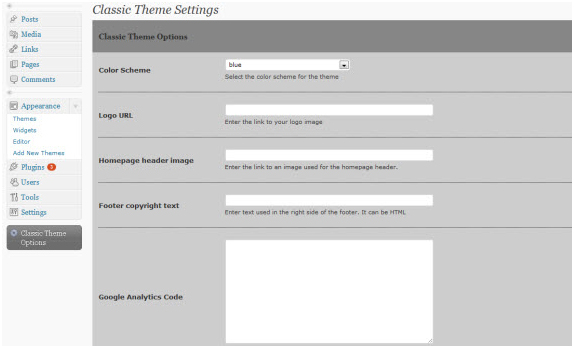
With all those steps completed this should be the final result.


