The auto-update system in WordPress checks for new updates, available for the installed plugins, every 12 hours and informs you by way of putting up notifications on the dashboard, whenever one is found. The advantages that can be gained by updating plugins mostly are
- addition of new features,
- fixing bugs, which, currently might be affecting the plugin functionality,
- Compatibility with the latest version of WordPress.
Updating WordPress plugins is really easy. A page for updates, which can be accessed through the dashboard menu, provides you with an option of updating all of your plugins at once instead of updating them one by one. It also features a ‘Check Again’ button, which checks for new updates if you don’t want to wait until the WordPress specified time. Or else, you could choose to manually update the plugins.
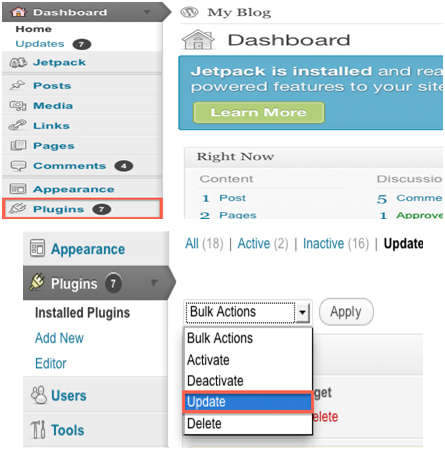
A more detailed set of instructions for updating the installed plugins in your WordPress automatically is as follows:
- Login to WordPress dashboard.
- On the left-hand side column, there will be a ‘Plugins’ tab. Click on it.
- Select all the plugins by checking ‘Plugins’
- Choose ‘update’ option from the Bulk Action drop-down menu.
This will automatically update all your installed plugins.
Sometimes though, automatic updates might not work. Or you might be using WordPress which is older than the 2.5 version and does not have the automatic update option. In such cases, there is always the option of updating your WordPress plugins manually via FTP. Follow the steps given below to update your plugins manually.
- Download the new plugin code
- Disable the existing plugin that you want to update.
- Keep a backup of the configuration files, if any.
- Delete the existing plugin from the wp-content/ plugins folder.
- Copy the new plugin code into the wp-content/ plugin folder.
- Enable the plugin.
This will update the respective plugin.


