There is nothing that compares to a visual impact on viewers. No matter how good your content may be- if it isn’t fun to go through, it will cause a hard time while going through, for even the best of your friends. So, to boost your site with some nice image edits and slideshows, be sure to go through this tutorial.
- Once you’re in the editing mode for your page, save the page with a title name if it’s new, so that creating the slideshow isn’t a problem (as found in many cases).
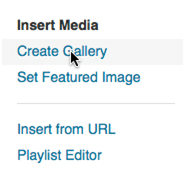
- Click on Add Media>Create Gallery.
- Either by drag-and-drop, or selecting files one-by-one from the computer, add whatever images you want in your post, and wait for them to upload. Once that’s done, they will be added to your Media Library, where more images can be inserted. Now, click on Create a New Gallery.
- Click on individual images to enter a description, caption, text or title. Here, the order of your images can also be altered by drag-and-drop.
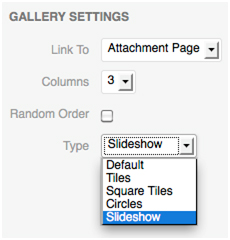
- With the various options available, opt for whatever view you’d like for your gallery, through the Gallery Settings.
- The link to option lets you link to a special page in your website or to a full-sized uploaded image. However, it doesn’t work in slideshows.
- Set the columns, which will decide the number of thumbnails appearing in each row. The Random Order check box is provided to randomize the order in which images will be displayed, every time the page is loaded. Also, you can additionally decide what way your gallery should be, through customizations such as square-tiled, circular-tiled or slideshow.
- After you are finished finalizing everything, click Insert Gallery.
- And voila, you now have a spectacular addition to your page!


