If you’re familiar with using Tables on Word Document, you’ll probably figure-out how to make one on WordPress in a jiffy. However, to make sure you don’t have to scratch your head too long in case you’re getting stuck along the way, or seeing results deviated from your expectations, here’s a quick walk-through on creating tables with TinyMce Advanced Plug-in and Easy Table Plug-in.
TinyMce Advanced Plug-In:
- In the drag-and-drop editor, click on the highlighted box as depicted in the picture below, to insert a new table:
- The screen which pops-up now has a multiple number of settings for you to change, as per your requirements. The options help alter the number of rows, columns, width, height, alignment, etc.
- Once the settings are adjusted, you are free to enter data into the table, which will look like this:
Easy Table Plug-In:
- In the settings tab, opt for the Easy Table tab, which will display as follows:
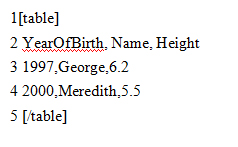
- To enter data into your table, here is a sample format that you will use:
The shortcode [table] helps the page know you’re starting your table, and the way you press enter to change a line, the same is done to move on to the next record. Be sure to separate table values with a comma.
Though this plug-in sounds great, there’s a catch to it- it won’t work with the free WordPress.com sites. So, unless you have a self-hosted website, stick to using the first plug-in mentioned previously.
Using plug-ins to insert a table is a cakewalk once you follow the instructions. And once you know how to go about with it, you’ll save yourself from the tedious task of copying from Excel everytime!


