Understanding and Using Custom Fonts in WordPress
Fonts are valuable inputs into making your WordPress website look catchy. In fact, you can actually add some style to your content through the application of some eye candy fonts, of course, without making it tough for the readers to comprehend the text.
However, there is an issue faced by users making their first attempts with WordPress websites. Availability of impressive fonts is never a concern, and you’ll soon have dozens of catchy fonts with you.
The problem arises because of the fact that the font you use with your website has got to be available at the end of the viewer as well! If the watcher does not have the same font installed at his machine, the font you used will get replaced with something else and you will lose all the advantage.
Worse still, your text might emerge unorganized and this will create a bad impression. So, does this mean that you can work with only those fonts that your viewers will have on their machines? Not exactly! Here is an extremely useful step-by-step guide to ensure that you do not lose out on using some powerful fonts to impress your viewers with.
To ensure that your clients and audiences see the desired font styles, you’ve either got to stick to universally popular fonts such as Times New Roman (although there could well be a case where a rather choosy client has uninstalled the font from his/her machine) or seek refuge in Custom Fonts. We’ll focus on the second alternative, which happens to be the more useful and dependable one as well.
Step-by-Step Guide to Installing Custom Fonts in WordPress
You must be introduced with font face kits before going any further. These are packages of fonts, put very simply. Fontsquirrel.com is a popular source of such kits. Of course, you can depend on Google to give you dozens of other kits, but fontsquirrel is a fine starting point.
The fact that this service allows users to manufacture their own fonts and customizing them further adds more to the popularity of fontsquirrel.com, so you would not mind beginning with these font face kits.
Now, we take you further on the steps that you’ll have to climb before reaching your custom fonts destination.
1. Hit fontsquirrel.com and locate the “@font-face kits” link in the main navigation space. Click on this link. You will be taken to a different page with many fonts. Pick what suits you from the options.
2. The font will have a “Get Kit” button nearby. This is the download link. Click on it and download the kit.
3. Now, switch over and choose a FTP client to undertake the next step. FileZilla is a fine option. Using this FTP client, head over to your WordPress directory and explore till you reach the wp-content/themes/your-current-theme/ folder in the directory.
4. Here, you’ve got to create a new folder. Use the name of the font you are going to use. For instance, key in Lane as the folder name if the font you’ll use is called Lane.
5. Now, recap to the second step of this process and locate the downloaded zip file and then extract its contents. Then, select all the files in the extracted folder. Follow this up with the process of uploading them to a new directory in your WordPress themes folder.
Make sure to upload the files and not the folder containing them. A hint here, if you see a file named ‘stylesheet.css”, you are doing it alright.
6. At this point, we shift the focus on linking the recently uploaded stylesheet.css file from the header.php file in the directory of the theme. You will require the services of your FTP client again here, using which you can download the header.php file to the desktop in the main theme’s download directory.
Open this file in notepad and locate the link to the main style sheet in the file called header.php. Place the stylesheet.css link above this in the following manner.
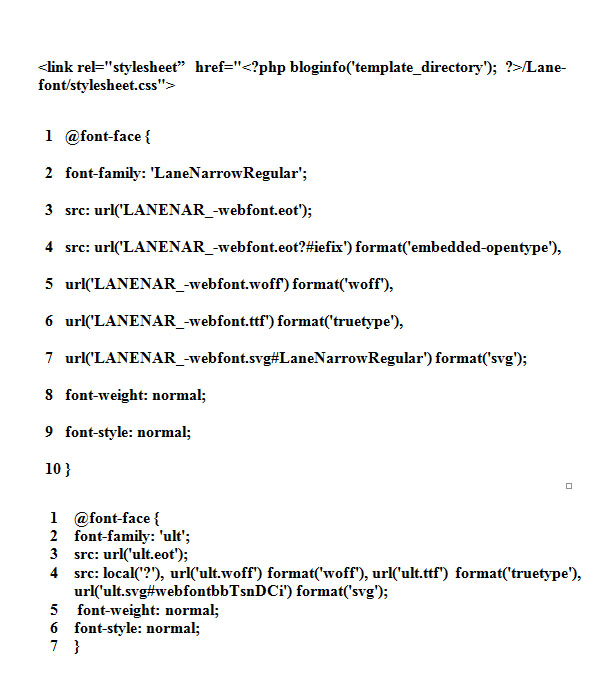
| <link rel=\”stylesheet” href=\”<?php bloginfo(\’template_directory\’); ?>/Lane-font/stylesheet.css\”> |
7. Now, you’ve got to upload this modified header.php file to the theme’s directory, replacing the original one in the process.
8. Now, you have to open the stylesheet.css file in the new font folder and look for a section of code that resembles the following snippet but with your font name. If you were working with a font named Lane, the coding bit would look something like:
| 123456
7 8 9 10 |
@font-face {font-family: \’LaneNarrowRegular\’;src: url(\’LANENAR_-webfont.eot\’);src: url(\’LANENAR_-webfont.eot?#iefix\’) format(\’embedded-opentype\’),url(\’LANENAR_-webfont.woff\’) format(\’woff\’),url(\’LANENAR_-webfont.ttf\’) format(\’truetype\’),
url(\’LANENAR_-webfont.svg#LaneNarrowRegular\’) format(\’svg\’); font-weight: normal; font-style: normal; } |
9. In the code, the text that follows “Font-family” is the required font name that has to be used in the font family declarations for calling the font.
10. As the final step, you have to open the main style sheet of the theme and add the font family tag with the name of your font wherever you want it to appear.
Follow these ten simple steps and you will be using a great font without having to worry if the viewers of the page have it installed at their end.
So now, what to do if you want to use a font you found in some other website but don’t have the necessary package from fontsquirrel.com like the one discussed above? This is how you handle such a situation.
- You begin by finding out the folder of the font you would like to work with. The font you want to use has to have the True Type font file types of WOFF (Web-Open Font Format) and EOT. WOFF is basically a wrapper that contains fonts that have been compressed using a WOFF encoding tool to enable them into being embedded in a web page or an EOP.
- Go to the main stylesheet of the website and find the font-family declaration, as explained in the earlier process. Again, copy the font family line and use it in the style sheet of your theme wherever you intend to use the font.
- Create a stylesheet.css file and upload it to the folder containing the new font files.
Follow this pattern:
1 @font-face {
2 font-family: \’ult\’;
3 src: url(\’ult.eot\’);
4 src: local(\’?\’), url(\’ult.woff\’) format(\’woff\’), url(\’ult.ttf\’) format(\’truetype\’), url(\’ult.svg#webfontbbTsnDCi\’) format(\’svg\’);
5 font-weight: normal;
6 font-style: normal;
7 }
A similar section can be found in the CSS files of the site you copied the font from. Copy it once you locate it, or you can use the example ensuring that the URL is changed to be in accordance with your file system.
That’s about it, and just in case you face any hassles, double check for any errors in the stylesheet.css file or the main style.css file for the template.


